
To transfer a domain name, unlock it at the current registrar and obtain the authorization code. Then, initiate the transfer process at the new registrar by providing the domain name and authorization code.
How to Transfer a Domain Name:Transferring a domain name can seem daunting, but it’s a straightforward process. Whether you’re changing registrars for better pricing or services, understanding the steps involved is crucial. A successful transfer ensures that your domain remains active and your website stays accessible.
This guide will walk you through the essential steps to smoothly transfer your domain. By following these steps carefully, you can avoid common pitfalls and ensure a seamless transition. Let’s explore how to effectively manage your domain transfer with confidence.
Introduction To Domain Transfer
Transferring a domain name can seem daunting. Yet, it’s often necessary. A domain transfer moves your website address from one registrar to another. This process offers various advantages. Understanding the reasons and the risks helps you make informed decisions.
Reasons For Transferring A Domain
- Better Pricing: Some registrars offer lower renewal rates.
- Improved Customer Support: Quality support can save time.
- Added Features: Get more tools and options.
- Consolidation: Manage all domains in one place.
- Reputation: Choose a well-reviewed registrar.
Potential Risks And Benefits
| Benefits | Risks |
|---|---|
| Lower costs | Possible downtime during transfer |
| Better management tools | Loss of data if not backed up |
| Improved security features | Delay in the transfer process |
| Enhanced support services | Confusion over domain settings |

Credit: blog.hubspot.com
Pre-transfer Checklist
Transferring a domain name can be simple. Follow this checklist to ensure a smooth process. Each step is crucial for successful transfer.
Domain Eligibility
Before starting, check if your domain is eligible for transfer:
- Domain must be registered for at least 60 days.
- It should not be locked or on hold.
- Verify if you own the domain.
Use the following table to confirm eligibility:
| Criteria | Status |
|---|---|
| Registered for 60 days | Yes/No |
| Domain is unlocked | Yes/No |
| Owner verified | Yes/No |
Unlocking Your Domain
Unlock your domain to start the transfer:
- Log in to your current registrar’s account.
- Go to the domain management section.
- Find the lock status of your domain.
- Click on the lock icon to unlock.
Unlocking allows the new registrar to take over.
Obtaining Authorization Code
Next, you need an authorization code:
- This code is also called an EPP code.
- It prevents unauthorized transfers.
To get the code:
- Access your current registrar account.
- Locate the domain settings.
- Request the authorization code.
Keep this code safe. You will need it during the transfer.
Selecting The Right Registrar
Choosing the right registrar is essential for domain management. A reliable registrar offers good service and features. This section covers two important aspects: evaluating registrar features and understanding transfer policies.
Evaluating Registrar Features
Look for key features that meet your needs. Here are some essential features to consider:
- User-Friendly Interface: Easy navigation helps manage domains smoothly.
- Customer Support: 24/7 support is vital for quick issue resolution.
- Domain Management Tools: Tools for DNS settings, email forwarding, and more.
- Security Features: Look for two-factor authentication and privacy protection.
- Domain Transfer Assistance: Support during the transfer process is important.
Compare registrars based on these features. Use a simple table for quick reference:
| Registrar | User-Friendly Interface | Customer Support | Security Features |
|---|---|---|---|
| Registrar A | Yes | 24/7 | Two-Factor Authentication |
| Registrar B | Yes | Business Hours | Basic Security |
| Registrar C | No | 24/7 | Two-Factor Authentication |
Understanding Transfer Policies
Each registrar has different transfer policies. Knowing these helps avoid surprises.
- Transfer Fees: Some registrars charge a fee for transfers.
- Domain Lock: Unlock your domain before starting the transfer.
- Transfer Time: Transfers can take several days. Check expected time frames.
- Eligibility: Ensure your domain meets eligibility requirements.
- Check the current registrar’s transfer policy.
- Unlock your domain.
- Request the transfer code.
- Initiate the transfer with the new registrar.
Being informed simplifies the transfer process. Make the right choice for your domain needs.
Initiating The Transfer Process
Transferring a domain name can seem complex. Follow these steps for a smooth transfer. Start by understanding what’s needed to initiate the process.
Submitting Transfer Request
Begin by submitting a transfer request to your new registrar. Here’s how:
- Log in to your new registrar account.
- Locate the domain transfer section.
- Enter the domain name you want to transfer.
- Provide the authorization code from your current registrar.
- Click on “Submit” or “Transfer”.
This request usually takes a few minutes. Ensure your email is valid. Check for confirmation emails from both registrars.
Verifying Domain Ownership
Verification is crucial for a successful transfer. Follow these steps:
- Access your current registrar’s account.
- Find the option to unlock your domain.
- Set up an authorization code if you haven’t done so.
- Confirm your email address is current and accessible.
Keep in mind:
| Step | Action Required |
|---|---|
| 1 | Unlock your domain |
| 2 | Obtain authorization code |
| 3 | Update your email if needed |
Once verified, the transfer process can continue smoothly.
Handling Transfer Delays
Transferring a domain name can face delays. Understanding the reasons helps resolve issues quickly. Here’s what you need to know about handling transfer delays.
Common Causes Of Delays
- Domain Lock: The domain may be locked at the current registrar.
- Pending Approval: Approval from the current registrar is required.
- Incorrect Information: Mismatched contact information can cause issues.
- Transfer Hold: Some domains have a 60-day transfer hold.
- Expired Domain: If the domain is expired, transfers may fail.
Troubleshooting Tips
Resolving transfer delays requires a few steps. Follow these tips to troubleshoot effectively:
- Check Domain Status: Ensure the domain is unlocked.
- Verify Contact Info: Confirm the email and phone number are correct.
- Request Approval: Contact your current registrar for approval.
- Review Transfer Policy: Understand the policies of both registrars.
- Wait for Propagation: Some delays happen during DNS updates.
Use these steps to address common delays. Keep your registrars informed for quicker solutions.
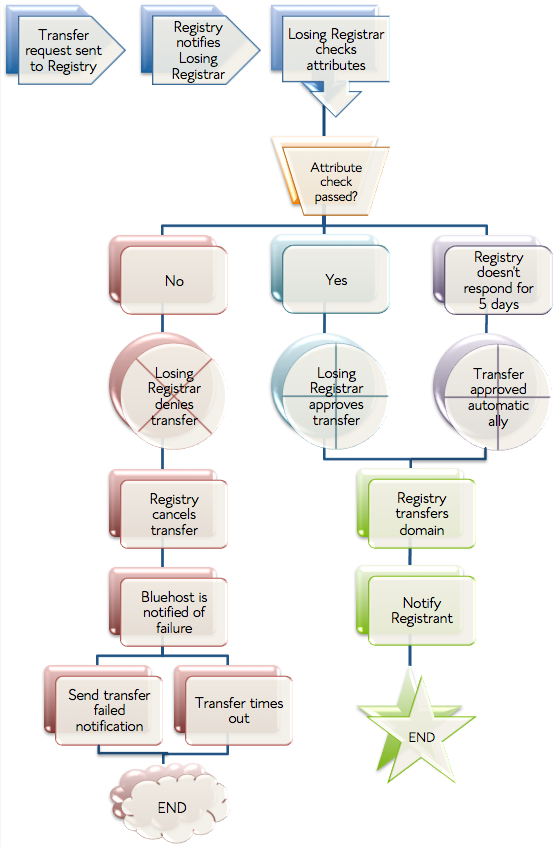
Credit: www.bluehost.com
Post-transfer Actions
After transferring your domain name, some important actions are necessary. These steps ensure your domain works smoothly. Here are the key actions to take:
Confirming Transfer Success
Check if the domain transfer completed successfully. You can do this by:
- Logging into your new registrar account.
- Finding the domain in your account dashboard.
Look for a confirmation email from your new registrar. This email confirms the successful transfer.
Updating Dns Settings
Updating your DNS settings is crucial. This step connects your domain to your website. Follow these steps:
- Log into your new registrar account.
- Find the domain you just transferred.
- Access the DNS settings or DNS management section.
- Update the nameservers as needed.
Make sure to save your changes. DNS updates may take some time to propagate.
Renewing Domain Registration
Check your domain’s registration status. Ensure it is active and not expired. Consider renewing your domain registration:
- Log into your new registrar account.
- Find the renewal option for your domain.
- Select the registration period.
- Complete the payment process.
Renewing your domain prevents it from expiring. This action keeps your online presence secure.
Security Best Practices
Transferring a domain name can be exciting. Protecting your domain is essential. Follow these security best practices to keep your information safe.
Protecting Personal Information
Keeping your personal information safe is crucial. Use these tips:
- Whois Privacy: Enable Whois privacy protection. This hides your contact details from public view.
- Strong Passwords: Use complex passwords for your registrar account. Include numbers, symbols, and both uppercase and lowercase letters.
- Two-Factor Authentication: Enable two-factor authentication (2FA). This adds an extra layer of security.
Take action to limit exposure. Avoid sharing sensitive information via email. Regularly monitor your domain for unauthorized changes.
Enabling Domain Lock
Domain locking helps prevent unauthorized transfers. Follow these steps to enable it:
- Log in to your domain registrar account.
- Locate the domain management section.
- Find the option for domain lock or transfer lock.
- Enable the lock feature.
When enabled, this feature prevents others from transferring your domain without your consent. Always remember to unlock your domain before initiating a transfer.
Credit: nickjanetakis.com
Troubleshooting Common Issues
Transferring a domain name can have hiccups. Knowing common issues helps. Here are some tips to tackle them effectively.
Failed Transfers
A transfer may fail due to various reasons:
- Domain Lock: Check if the domain is locked. Unlock it before transferring.
- Incorrect Auth Code: Ensure you have the correct authorization code.
- Expired Domain: An expired domain cannot transfer. Renew it first.
- Registrar Policies: Different registrars have specific rules. Understand them well.
Review these points if your transfer fails. Addressing them can save time.
Contacting Support
If issues persist, contacting support is crucial. Follow these steps:
- Gather all relevant information:
- Your domain name
- Registrar details
- Error messages received
- Reach out via email or chat.
- Be clear and concise in your explanation.
- Follow up if you don’t get a response.
Support teams can provide specific solutions. Keep communication open and polite.
Resolving Disputes
Sometimes, disputes arise during transfers. Here’s how to resolve them:
| Issue | Solution |
|---|---|
| Ownership Conflicts | Provide proof of ownership to both registrars. |
| Payment Issues | Ensure all fees are paid before starting the transfer. |
| Domain Not Eligible | Check eligibility criteria of the new registrar. |
Keep records of all communications. This can help resolve disputes quickly.
Frequently Asked Questions
How Do I Transfer A Domain Name?
To transfer a domain name, first unlock it at your current registrar. Obtain the authorization code and provide it to the new registrar. Follow their instructions to complete the transfer process. This usually takes a few days, so monitor your email for any confirmation requests.
What Are The Fees For Transferring A Domain?
Transfer fees vary by registrar. Typically, you may incur a fee that includes a one-year renewal of your domain. Some registrars offer promotions, so it’s wise to check their websites. Always review the total cost before finalizing the transfer.
How Long Does A Domain Transfer Take?
A domain transfer usually takes 5 to 7 days to complete. However, the exact duration may vary based on the registrars involved. After submitting your transfer request, check your email for updates. If there are any issues, contact your current or new registrar for assistance.
Can I Transfer A Domain Name Before It Expires?
Yes, you can transfer a domain name before it expires. However, it’s advisable to start the transfer process well in advance. Most registrars allow transfers up to 60 days before expiration. Ensure your domain is unlocked and you have the authorization code ready.
Conclusion
Transferring a domain name can seem daunting, but it’s a straightforward process. By following the steps outlined in this guide, you can ensure a smooth transition between registrars. Always keep your information updated and secure. With the right approach, managing your domain can be hassle-free and efficient.


Leave a Reply